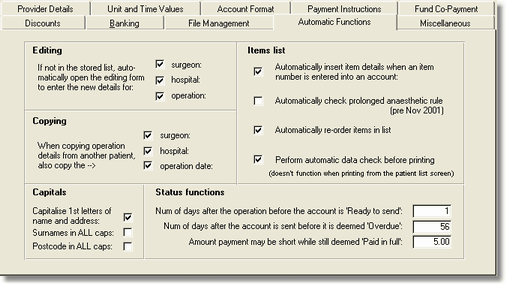
The following options will affect the data entry process

Inserting a new surgeon, hospital or operation
Each time you type a surgeon, hospital or operation into a patient's account, the system looks to see if it exists in the appropriate lookup list (e.g. the list of stored operations). If it doesn't exist, a form will pop up asking you for details of the surgeon, hospital or operation to be stored in the list. This is useful if you want to store new names for future reference. However, since anaesthetists typically do many operations a small number of times each you may not want to store all the operations. Similarly, if you do a lot of cases with many different surgeons, you may not want to store them as a routine. In these cases, having the form pop up each time may be a bit annoying. You can disable this feature by unchecking the relevant box in the Editing section.
| Note | This process doesn't happen if you enter a surgeon, hospital or operation abbreviation or if you choose one from the lookup list. See the Operation section for more information. |
Copying operation details
There are two copy buttons on each account's Operation page to copy the operation details from one account to another to streamline data entry for commonly performed procedures. The detailed copy function can be customised by specifying whether or not it should copy the surgeon, hospital and operation date (as well as copying the operation, item and fee details). If, for example, you do a list of several of the same type of procedure, say colonoscopies, you may prefer to copy the surgeon, hospital and operation date. If you mainly use this function to copy operations done in other hospitals by other surgeons on other days, it would be better to uncheck these options. Of course, they can all be manually entered or removed as appropriate in each individual account. These options do not affect the Quick Copy function; this always copies the surgeon, hospital, operation and operation date from the previous account.
Capitalisation
If checked here, when names and addresses are entered into an account, the first character of each word is automatically capitalised. This means you don't have to use the Shift key when entering the data. If you wish to enter a name with a lower case first initial such as 'van de Someone', turn this function off, enter the data, and then turn the function back on. If you choose to leave the automatic capitalisation off, you can capitalise name and address fields by double clicking on them with the left mouse button.
Some clients also prefer to show the surname and/or suburb in all capital letters and this can be specified here. Note that in most instances, the suburb inserted from the lookup list will already be capitalised since this is how it exists in the Australia Post list.
Insertion of item details
Normally when you enter an item number into an account's Items page, that item's details are entered for you. This option can be disabled by switching off this checkbox. The reason you may want to disable this is so that you can have greater control over what appears in the items list. For example, you may wish to enter an item, then remove its item number without removing the procedure and fee details. Or you may wish to be completely free to enter whatever you wish into the item number fields without having the system look for matching items. We would expect that you would only disable this function in very unusual circumstances.
If you have disabled this function, you can still insert the item details from either the MBS or RVG book by clicking the Insert item from book button on the Items page. And you can always add the item directly while viewing the book.
Prolonged anaesthesia calculation
The prolonged anaesthesia calculation was used in the pre-RVG era and is no longer required. It is left here for backward compatibility. The post- November 2001 multiple anaesthetic rule (where the base unit value of the second anaesthetic procedure is discounted to zero) is calculated automatically irrespective of the setting of this switch.
Automatic ordering function
When entering items on an account's Items page, the list of items is ordered according to built-in rules. In most cases this ordering will be satisfactory, and minor adjustments can be made by adjusting the ordering codes in the leftmost column. It is possible to disable the automatic ordering so that items simply appear in the order they are entered. It it then up to you to specify your preferred ordering. If you do disable this function, it can be activated for individual accounts by pressing the Auto Order button on the Items page.
Automatic data check
The data check can be run manually from the Account details screen, or you can have it activated automatically just prior to printing the account. In the latter case, you will be alerted to any high-priority errors, but not low-priority errors, before printing proceeds. You can switch the automatic check on or off in the Options form (default is on).
Automatic status functions
These three fields allow you to specify how long after an operation the account should be sent, how long after sending an account before it is deemed overdue and the amount the payment may be short while still being deemed paid in full. These control the automatic status changes in the system which are updated each time the system is started.
| Note | The system will not automatically print accounts, receipts or reminders which are due for printing. The automatic status functions simply change the phrase shown in the Status field to allow you to identify which accounts are ready for certain processes. |