In many parts of the system, Access Anaesthetics provides the user with a Microsoft Access datasheet for viewing and editing data. Datasheets display data in a spreadsheet-like format which is good for looking at a list of records and is a useful environment for making changes to multiple records in a table. The most recognisable datasheets in Access Anaesthetics are the lookup tables. That is, the tables of postcodes, surgeons, hospitals, messages, cheque drawers, banks and so on. These can usually be viewed by clicking the Edit button associated with the relevant field. For example, the surgeon's field looks like this:

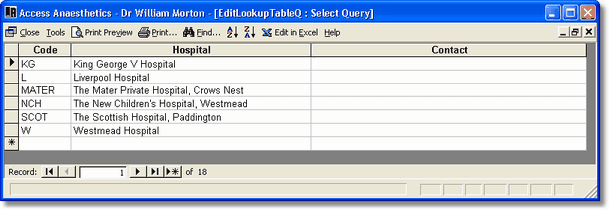
The surgeon's name is stored in the field. The dropdown List of surgeons box allows you to select a surgeon by clicking on a name in the lookup list. The Edit this surgeon button allows you to view and edit the chosen surgeon's details (which are stored in the lookup table) in a popup form. Finally, the Edit all surgeons button allows you to view and edit the stored details of all the surgeons. The screen you see when you click this button is an Access datasheet. The following image shows part of the Hospitals lookup table datasheet.

There are a number of other places where datasheets are used but where the standard datasheet editing window is not always visible. This is because the datasheet is set within another form (it is a subform). The Lists of Accounts and Payments are examples of datasheet subforms. There are also a range of smaller datasheets which appear inside other forms, for example, the status log on the Status page of the Account details form and the list of payments on the Payments page of the Account details form.
The following editing methods apply to some datasheets but not to others. In general, all these methods are applicable when editing lookup table datasheets but may not all be available in datasheet subforms.
Menu options
The toolbar menu on the top of the datasheet has a number of functions as described below. However, not all datasheets will have the same options on the toolbar menu and this depends on the type of datasheet you are viewing.
Scrolling and zooming
Use the horizontal and vertical scroll bars to view rows or columns which are not currently visible on the screen.
Setting the width of columns
Move the mouse to the line on the right of the column heading you wish to resize. When the arrow turns to a double headed horizontal arrow, click and drag the column's border to increase or decrease its width. |
|
Moving columns
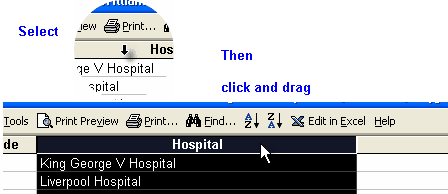
Select (highlight) the column (or columns) by moving the mouse to the column heading until it becomes a down arrow, then click the left mouse button (drag to select more than one column). Move the mouse again to the heading until it shows a normal pointer then left click and drag the column(s) left or right as desired. You can drag columns past the left or right edge of the screen if you are not at the left or right edge of the entire datasheet.

Saving changes to datasheets
If you make any changes to the datasheet layout as described above these will not be saved unless you specifically save them. When you close a datasheet where you have modified the layout, you will be asked whether you wish to save the changes. In general it is best not to save the changes unless you are sure that you want to keep the changes you have made. You cannot lose anything by not saving the changes and remember that you are not being asked to save data changes, but only changes to the visual layout of the datasheet. In some instances, the datasheet is created only when you want to view it and the formatting is recreated too, so saving the datasheet layout may have no effect on the default formatting provided by the system.
Not all datasheets will allow changes to be saved. For example, any report datasheet is simply an Access query and as soon as another report is run, the formatting will revert to the default according to what data is returned by the query. In most datasheet subforms embedded inside other forms, saving changes is not recommended since the datasheets have been formatted especially to work within the form and formatting changes may reduce the functionality of the datasheet.
If in doubt, do not save changes when prompted.
Adding Records
To add a record to a datasheet, position the cursor in the last row and begin typing data into the fields. The last row is called the data entry row and will have an asterisk (*) in its leftmost grey column. Not all datasheets will allow the user to add records and this is a feature built in to the design of the Access Anaesthetics system to avoid inappropriate data entry. This is so where there are specific methods for adding records such as in the List of Accounts and List of Payments etc. Usually you would only add records to datasheets in places such as the lookup tables, for example, in the Surgeons or Hospitals tables.
Editing and saving records
When a change is made to a field in a datasheet, the leftmost grey column displays a pencil icon. This indicates that the record (row) is currently being edited but that the changes have not yet been saved. Changes do not have to be specifically saved; this happens automatically when the user closes the datasheet or form, or moves to another record.
When the record is saved, the pencil icon is replaced by the standard right arrow icon. If the record is currently being edited (the pencil icon is visible), the changes already made to the record can be reversed by pressing the ESCAPE key on the keyboard. Not all datasheets will allow data to be edited. |
|
Deleting records
To delete one or more records from a datasheet, select them by clicking (or clicking and dragging) in the grey record selection box on the left. Then press the Delete key on the keyboard. You will be given a warning before the records are deleted. Not all datasheets will allow records to be deleted. |
|
Sorting records
|
Click in a column you wish to sort the datasheet by then press the Sort Ascending (A-Z) or Sort Descending (Z-A) icon on the toolbar. Not all datasheets will allow this option. |
Finding data
Place the cursor in the field (column) in which you wish to search. Click the Find icon (binoculars) on the toolbar. Use the popup dialog box to specify what you want to find and where to look.
To jump to a record in a long list, click in the record navigation box at the bottom left of the screen where it says, for example, 'Record 37 of 2500' and type a record number to go to. |
|
The record number is a simple incremental listing number. It is not necessarily related to the Account Number or any other built-in identification number.
Printing the datasheet
Datasheets may be printed by using the Print Preview icon on the toolbar, but sometimes this will result in messy printouts which are difficult to format. If possible, use the print methods which are built in to the system and which are accessed by specific Print buttons. Where print setup options are changed, from the print preview screen, saving them may or may not save the changes to the datasheet depending upon the type of datasheet it is (table, query, form or report). If in doubt it is probably best not to save formatting changes.
Exporting data
Data in a datasheet may be exported to a Microsoft Excel file by clicking the Edit in Excel button on the toolbar. You will be prompted for a file name and the file will be stored in the DOCUMENTS subfolder of your Access Anaesthetics folder (e.g. C:\Access Anaesthetics\Documents\ MyDatasheet.xls). Any data in a Print Preview screen can also be exported in this way, or additionally exported as a formatted .rtf (rich text format) file which can be read in Microsoft Word.

