Transferring files from one place to another on your computer or from your computer to a floppy disk is a fundamental technique all computer users should be adept at. Although file transfers are not required to run Access Anaesthetics, a brief description of how to move files is given here in any case, since you will inevitably have to do it for backups, re-installations and hardware upgrades etc.
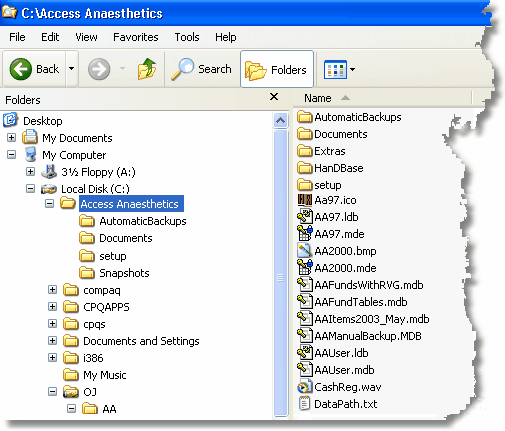
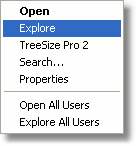
When transferring files, standard methods using Window Explorer are the easiest. Open the Explorer window by right clicking on the Start button and clicking Explore (there are other ways of doing this but this one is fairly generic). In later versions of Windows, you can do most of these functions also by using My Computer. |
|
Viewing the file hierarchy
The Explorer window shows a list of folders (or directories) on the left and a list of folders and files on the right. The list on the right shows the folders and files which are contained in the open or highlighted folder on the left. Click on another folder on the left to display its contents on the right.
The folders on the disk exist in a hierarchy where one folder contains other folders. Folders which contain other folders have a + sign next to them in the left window. Click the + sign to display the folders inside the first folder. These folders may in turn contain other folders.
All the storage devices on your computer are shown in the Explorer window. This may include one or more hard disks (typically C: or D:), one or more floppy disks (usually a:), a CD ROM (D: or E:), a zip drive (D: or E:), or, if your computer is on a network, one or more network drives (D: to Z:).
Moving and copying files
| 1. | Click the file or folder you want to copy or move, thereby highlighting it. |
| 2. | On the Edit menu, click Copy or Cut. (Both commands copy the file to the clipboard, but Cut additionally deletes the original.) |
| 3. | Open the folder where you want to put the file or folder. |
| 4. | On the Edit menu, click Paste. |
As a shortcut, click on and drag the file or folder to the folder you wish to move it to.

Copying a file to a floppy disk
| 1. | Insert a disk into the floppy disk drive. |
| 2. | Click the file(s) you want to copy, thus highlighting it (them). |
| 3. | On the Edit menu, click Copy. |
| 4. | Click the icon for the floppy drive and, if necessary, open the folder where you want to put the file or folder. |
| 5. | On the Edit menu, click Paste. |
Alternatively, click and drag the file or folder to the floppy disk folder you wish to copy or move it to.
Also use this method to copy files to any other storage devices you may have such as zip drives.
Deleting files
| 1. | Locate the file or folder you want to delete and click to highlight it. |
| 2. | On the File menu, click Delete, or press the Delete key on the keyboard. |
| 3. | The file(s) or folder(s) will be moved into the Recycle bin. |
Deleted files remain in the Recycle Bin until you empty it. To empty the recycle bin, open it and delete its contents.
Another way to delete a file is to drag the file or folder icons onto the Recycle Bin icon. If you press SHIFT while dragging, the item will be deleted from your computer without being stored in the Recycle Bin.
Restoring deleted files
| 1. | To restore a file you have deleted, open the Recycle Bin and select the file or folder to restore. |
| 2. | From the File menu, select restore. The selected file or folder will be returned to its original location. |
Note on copying versus moving
If you copy a file, it remains in its old location and a copy is created in the new location. If you move a file, a copy is created in a new location but the existing file is deleted from the old location. When you drag files with the left mouse button, the default action is to copy if the destination folder is on a different drive (e.g. from a hard drive to a floppy drive). If the destination drive is the same as the source drive, the default action is to move, and the source file will be deleted from its original location. If you use either method to copy an executable file (one with an .exe file extension) to a different location on the same drive, the file will not be moved, but rather a shortcut to the existing file will be created in the new location.
Creating a new folder
| 1. | Open the folder in which you want to create a new folder. |
| 2. | On the File menu, point to New, and then click Folder. The new folder appears with a temporary name. |
| 3. | Type a name for the new folder, and then press ENTER. |
Renaming a file or folder
| 1. | Click the file or folder you want to rename. You do not need to open it. |
| 2. | On the File menu, click Rename. |
| 3. | Type the new name, and then press ENTER. |
Alternatively, click the name twice slowly to rename it without going to the File menu. (N.B. Clicking twice is slightly different to double clicking.)
A filename can contain up to 255 characters, including spaces. But, it cannot contain any of the following characters: \ / : * ? " < > |.
Tips
| • | To change the size of either side of the Explorer window, drag the bar that separates the two sides. To increase the size of the entire window, click the Maximise button on the top right or drag the left, right or bottom borders. |
| • | To quickly open a folder and display its subfolders, double-click the folder on the left side of the window. |
| • | To open a file or folder, or start a program, double-click it. |
| • | You can use the keyboard shortcuts <CTRL>C to copy files and CTRL>V to paste files, that is, hold down the Control key while you press C or V. |
| • | Right click on a file or group of selected files or folders to open a shortcut menu containing the Cut, Copy, Paste, Delete, New and various other commands. |
| • | If you want to select more than one file or folder to copy or move, hold down the CTRL key, and then click the items you want. You can also select a group of files by clicking one file, then holding down the SHIFT key and clicking the other file. All the files in between will be selected. |
| • | If you drag a file with the right mouse button, when you let go, a menu will appear giving you the option to move the file, copy it or create a shortcut to it. The last option is a useful way of putting a shortcut to a program or file onto the desktop. Drag the file out of the Explorer window to the desktop. |
File types
Each file is a certain type according to the data it contains or the application required to open or activate it. The file type is identified by the file name extension, that is, the 3 character code on the end of the file name after the full stop. For example, 'Recipes.txt' is a text file and 'Recipes.mdb' is a database file. Some common file types are:
.doc Word document .bmp Bitmap image
.mdb Access database .zip compressed Zip file
.txt Ascii text .xls Excel spreadsheet
.exe executable program .html hypertext markup language (web page)
It is important that you know the file name extension when you are copying or moving files because there may be several files with the same name which have different extensions. For example, in Access Anaesthetics the following files are all called AA97.
AA97.mde main program file which runs the database
AA97.hlp the on-line help file
AA97.ico icon appearing in the Access Anaesthetics title bar
AA97.bmp the image which appears when the system first opens
AA97.ldb a file used for managing multiple users on a network
If you cannot see the file name extensions when you look at the files in Windows explorer, go to the View menu, click Options, click the View tab, and make sure the option to 'Hide MS-DOS file extensions for file types that are registered' is unchecked. You may also need to select the 'Small icons', 'List' or 'Details' option on the View menu. The 'Large icons' options will not show the file type, although the icon itself will give you a hint as to what type of file it is.
If you need to move Access Anaesthetics files from one computer to another, see the Transferring data between two computers section.
