There are several ways to print accounts. The simplest is to use the Print now button on the bottom of any Account details screen.
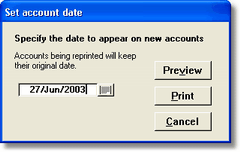
This will open the print dialog box (shown at right) enabling you to preview or print the current account. |
|
While in the preview window, use the Print button on the toolbar to print one copy of the account to the printer. You can specify in the Options form (Misc page) if you would like to be prompted to print multiple copies. |
|
Printing multiple accounts
If you wish to print a batch of accounts at one time, do this from the List of Accounts screen. First select a group of accounts to print using the Select menu. For example, select accounts which are Ready to send or Overdue.
Then use the Print Accounts - All Shown button on the bottom left of the screen. Alternatively, you can limit the accounts by tagging selected accounts in the list, and printing the Tagged accounts. |
|
This method is useful if you wish to enter a batch of accounts in one go, then print them all out later. The Tag field is duplicated on the Account details screen, and you can tick these as you go if you just want to print specific accounts. |
|
Tagging is not necessary for printing. A group of accounts can also be selected by other means.
Inserting the Account date
When an account is first printed on a printer, the date specified in the print dialog box will be inserted into the account as the Account Date. This will happen only if the Account date is currently blank and will happen whether you print an account individually from the Account details screen, or in a batch from the List of Accounts screen. The date will not be inserted if you just preview the account without printing it on the printer.