Batch payments are those where more than one account is paid using a single payment. This may happen, for example, when you receive a cheque from Medicare or Veterans' Affairs and it includes payments for several patients in the one cheque.
One batch payment is distributed across several accounts. When this is done, a new payment record is created for each account which receives part of the batch payment. Thus if one batch payment contains payments for 3 accounts, there are a total of 4 payments - one batch payment and 3 distributed payments. The three distributed payments add up to the same amount as the 1 batch payment.
So that these amounts are not duplicated in any reports, the batch payments are included only in bank deposit slips or listings of unbanked payments, while the Distributed payments are included in all other financial reports, effectively taking the place of the single batch payment. In this way, the payment is never added up twice and never omitted.
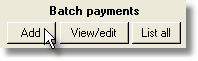
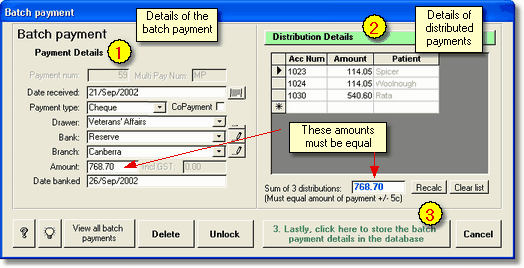
To add a batch payment, click the Add button under the Batch Payments heading on any patient's Payment page (you can also do this from the List of Payments screen). The following screen will open. |
|
There are three steps to entering a batch payment.
| 1. | Enter the details of the actual batch payment on the left hand side of the form, that is, the cheque you have received which covers multiple accounts. This data entry is identical to the method for entering standard payments in an individual account record. Thus, you should enter a date received, payment type, drawer, bank, branch and amount. The standard abbreviations, lookup tables and shortcuts are all available, and the same payment type conventions apply to bank deposit slips. |
| 2. | Once you have entered an amount and pressed the <ENTER> key, the fields on the right hand side will become activated. For each account you wish to distribute part of the batch payment to, enter the account number and the amount to be distributed to that account. A lookup list of open accounts is provided in the account entry field. When an account number is entered, the amount owing is automatically inserted into the amount column as the default. This may be changed if required. |
| 3. | When you have entered all the distributions, the total of the distributions should equal the amount of the batch payment. If this is so, button 3 will become activated. Click button 3 to store the batch payment details in the database. |
During this final process, the payment status is updated in the same way as it would be for a standard payment. That is, if the payment matches the fee owing, the status will be changed to Paid in full and the account will be closed by inserting a Date account closed. If money is still owing, the status will be updated to include the subscript -part paid. The receipt tag will be ticked if appropriate.
You can click the Cancel button at any time (before clicking button 3) to abandon the batch payment process.
Once the process is completed, the batch payment will appear in the unbanked payments list and the distributed payments will appear in each individual account record and will be available for financial reporting. When the next deposit slip is printed, the banking date will be inserted into both the batch payment and the distributed payments. If the payment is a type which does not appear on a deposit slip, today's date will be automatically inserted as the banking date when entering the payment details and, after distribution, will appear in all 4 payment records.
Batch Co-payments
If the batch payment is for a patient co-payment, tick the Copayment checkbox on the left side of the window. Distributed payments will also be designated as copayments. It is not possible to enter a batch payment which contains a mixture of standard and copayment payments. When entering a batch co-payment, the lookup list on the account number field on the right of the window will automatically insert the co-payment amount owed. This can be edited if required.
Editing batch payments
Batch payments can be identified by a red star in the Amount field. A batch payment shown in an individual account shows only that part of the actual payment which was allocated to the displayed account. |
|

To view the complete batch payment, put the cursor (click in) the row containing the payment and press the View/Edit button under the Batch Payments heading.
Batch payments can only be edited by first pressing the Unlock button on the editing window shown above. Once any change is made, button 3 must be pressed to complete the editing process. Otherwise the edits will not be saved.
It is also possible to delete batch payments by pressing the Delete button. The original batch payment and all the distributed payments will be deleted by this function. As with standard payments, if the batch payment already has a banking date when deleted, the payment details will be stored in the list of deleted payments which can be viewed (but not edited) from the List of Payments screen. The main purpose of this deletion function is to allow the user to manage a bounced cheque. It is expected that you would not otherwise delete a banked payment.
Viewing the main batch payments screen
To view all the batch payments stored in the database, click the List all button below the Batch payments heading on any account's Payments page (or do the same on the List of Payments screen). The following screen will appear.
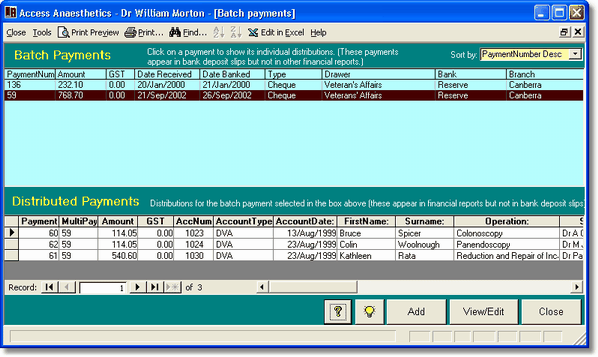
The top section of the batch payments screen shows the actual batch payments stored in the system. When you select one of these payments, the lower section shows the distributed payments for the highlighted batch payment. That is, the batch payment highlighted in the top section was divided up amongst the accounts shown in the bottom section. You can scroll the bottom section to the right to show all the fields currently not visible on the screen.
The batch payments at the top of the screen can be sorted by choosing a sorting field and direction from the Sort by list box on the top right of the screen. The distributed payments on the bottom of the screen can be sorted by using the A-Z and Z-A icons in the top menu bar when the cursor is in the column you wish to sort by.