The List of accounts and Account details screens display accounts according to your preferences. Usually this would be Open accounts, or other account types chosen from the Select menu.
It is also possible to specify advanced selection criteria to refine the selection in a more detailed way.
To do this, choose Advanced from the Select menu to display the screen shown here. |
|
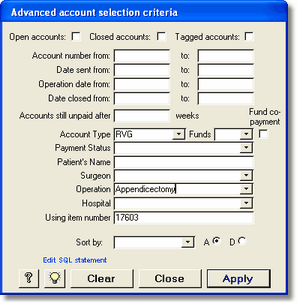
Entering criteria
Enter a single criterion into one field, or enter criteria into several fields. Multiple criteria are automatically joined using AND (as opposed to OR) so that only accounts which satisfy all entered criteria are displayed.
For 'from - to' fields such as dates and account numbers, the 'to' value is optional. If you just enter a 'from' value without a 'to' value, only accounts with the specified 'from' value will be displayed.
Open and Closed accounts refer to whether or not an account has a date in the Date account closed field.
For text fields such as patient's name or surgeon, you may enter a word, part of a word or more than one word. If you enter part of a word you could find, for example, all patients whose surname includes 'Jen'. This would find Jenkins, Jennings and Jenson. You may also select an option from the drop down list for some fields. The patient's name field searches the patient's entire name, that is, a text string which includes the title, first name and surname. If you use the 'part of word' option, you could find a specific patient by entering, for example, 'en Jen'. This would find Owen Jenkins and Ben Jenson but not George Jenkins. Note that for fields with a drop-down list, you can either choose an item from the list, or type directly into the field. Not all available options will necessarily be included in the drop-down lists.
You can optionally select a sorting field to sort the list in either ascending or descending order. This can also be done after the records are actually retrieved by using the A-Z and Z-A buttons on the menu.
Applying criteria
After you have specified all the criteria you wish, press the Apply button. The relevant records will be displayed and the Advanced selection form will disappear. If no records are found which match your criteria, you will be given a message and allowed to review your criteria.
Press the Clear button to remove all selection criteria and thus display all accounts. The Advanced selection form will remain open for you to insert additional criteria, or you may close it without applying new criteria by pressing the Close button.
Once criteria have been specified, they will remain in the form for you to modify later if you wish. This is the case even though you may reset the accounts shown in the List of Accounts without using the advanced selection form. For example, suppose you use the Advanced selection form to display all accounts sent between 1/4/1999 and 31/8/1999, where the surgeon was Dr Z Smith and the hospital was St Jupiter's. Later, you chose Overdue from the Select menu to show all overdue accounts. The next time you open the Advanced selection form, the 1/4/1999 - 31/8/1999 dates, Dr Z Smith and St Jupiter's criteria will still be shown even though the underlying list still shows just the overdue accounts. You can either modify the selection criteria to your needs, click the Clear button to reset the criteria or simply close the form without applying the specified criteria. In the latter case, the existing selection (overdue accounts) will be maintained.
The SQL option for expert users
When you specify selection criteria, you are actually creating an SQL (structured query language) statement with a Where clause which contains the details of all selection criteria in a string of text. This SQL text string is created automatically when you choose an option from the Select menu or when you specify criteria in the Advanced selection form. The SQL text string can also be edited manually without using the Select menu or the fields on the Advanced selection form by simply typing into the string itself. To do this, click the blue Edit SQL statement label on the Advanced selection form. The SQL WHERE clause will appear and can be edited.
After editing, click the Apply button as usual to show the matching accounts. Note that editing the SQL statement directly will not modify any of the data in the fields on the Advanced selection form and thus the form may not be a true representation of the criteria. |
|

The best way to use this function is to first add some criteria to the form fields, then view the resulting SQL statement. You can then see the syntax which has been inserted automatically and this will make it easier to determine how to modify it for your own purposes. It is then quite easy to modify a field name, a criteria or add additional phrases joined with AND or OR operators. The possibilities are endless!
| Tip | The 'Sort By' list box on the Advanced selection form shows all the fields in the accounts table which may be used for selection criteria. |
It is expected that most users would never use this option. It requires some knowledge of the Microsoft Access Visual Basic language and is prone to errors if the exact wording is not correct. It does, however, provide an additional level of customisation for expert users who may wish to create reports using more specific criteria than the Advanced selection form allows. If you get into trouble with this, just click the clear button to reset all the criteria and start again.